5.1 스프링 시큐리티와 OAuth
- 스프링 시큐리티와 OAuth 2.0으로 기능을 구현한다.
- 스프링 시큐리티란?
- 스프링 기반의 애플리케이션의 보안을 담당하는
스프링 하위 프레임워크 - 인증과 인가라는 두 가지 절차를 통해 어플리케이션을 보호한다.
- 스프링 기반의 애플리케이션의 보안을 담당하는
- OAuth 2.0이란?
- 인증을 위한 개방형 표준 프로토콜
- 3rd patry 프로그램에 소유자를 대신하여 접근할 권할을 위임.
- 구글, 카카오 등의 간편 로그인 기능도 OAuth 2.0 프로토콜 기반.
버전 확인
버전 확인
build-gradle로 가서 스프링부트 버전이 몇인지 확인해줘야 한다.- 2.0인지 아닌지 봐줘야 한다.
- 약간 달라질 수 있음.
5.2 구글 로그인 연동
구글 서비스 등록
- console.cloud.google.com 으로 이동
- 프로젝트 선택 → 새 프로젝트 선택
- 아무것도 없는 상태에서는 프로젝트 선택
- 다른 프로젝트가 있다면 [프로젝트 이름] 선택
- 서비스 이름 짓기
- API 및 서비스 카테고리 이동
- [사용자 인증 정보] 클릭 후 [사용자 인증 정보 만들기] 클릭
- 동의 화면 구성 누르기
- User Type : 외부 누르기
- 앱 이름, 지원 이메일, (맨 밑) 개발자 연락자 정보
- [사용자 인증 정보]로 돌아가서
- [Create Credentials] 클릭
- [OAuth 클라이언트] ID 클릭
- 어플리케이션 유형
-
웹 어플리케이션 클릭
-
이름 정하기
-
(밑에서) 승인된 리디렉션 URL - URL 추가
현재에는 개발 단계이므로 http://localhost:8080/login/oauth2/code/google 를 추가
-
[만들기] 클릭
-
- OAuth 클라이언트 생성됨
- 클라이언트 ID
- 클라이언트 보안 비밀번호
application-oauth.properties 등록
resource/application-oauth.properties 에 다음 코드 등록
spring.security.oauth2.client.registration.google.client-id='클라이언트 id'
spring.security.oauth2.client.registration.google.client-secret='클라이언트 비밀번호'
spring.security.oauth2.client.registration.google.scope=profile,email
★ ‘.properties’ 를 빼먹지 말자.
- 빼먹었을 때 다음 오류가 나온다.
The following candidates were found but could not be injected: - Bean method 'clientRegistrationRepository' in 'OAuth2ClientRegistrationRepositoryConfiguration' not loaded because OAuth2 Clients Configured Condition registered clients is not available
application.properties 에 등록
spring.profiles.include=oauth
.gitignore 에 등록하기
application-oauth.properties
5.3 구글 로그인 연동
User 클래스
User 메소드 생성
코드
package org.example.domain.user;


import lombok.Builder;
import lombok.Getter;
import lombok.NoArgsConstructor;
import org.example.domain.BaseTimeEntity;

import javax.persistence.*;

// 5.3장
@Getter
@NoArgsConstructor
@Entity
public class User extends BaseTimeEntity {
    @Id
    @GeneratedValue(strategy = GenerationType.IDENTITY)
    private Long id;

    @Column(nullable = false)
    private String name;

    @Column(nullable = false)
    private String email;

    @Column
    private String picture;

    @Enumerated(EnumType.STRING)
    @Column(nullable = false)
    private Role role;

    @Builder
    public User(String name, String email, String picture, Role role) {
        this.name = name;
        this.email = email;
        this.picture = picture;
        this.role = role;
    }

    public User update(String name, String picture) {
        this.name = name;
        this.picture = picture;
        return this;
    }

    public String getRolekey() {
        return this.role.getKey();
    }
}
Role 생성 : Enum Class (열거형 클래스)
코드
package org.example.domain.user;


import lombok.Getter;
import lombok.RequiredArgsConstructor;

// 5.3장
@Getter
@RequiredArgsConstructor
public enum Role {
    GUEST("ROLE_GUEST", "손님"),
    USER("ROLE_USER", "일반 사용자");

    private final String key;
    private final String title;
}
UserRepository 생성 (인터페이스)
코드
package org.example.domain.user;

import org.springframework.data.jpa.repository.JpaRepository;
import java.util.Optional; //직접입력

// 5.3장
public interface UserRepository extends JpaRepository<User, Long> {
    Optional<User> findByEmail(String email);
}
스프링 시큐리티 설정
build.gradle에 스프링 시큐리티 관련 의존성 추가
코드
dependencies {
    // 1장
    implementation('org.springframework.boot:spring-boot-starter-web')
    testImplementation('org.springframework.boot:spring-boot-starter-test')

    // 2.3장 롬북
    // 2.4장 롬북 일부 수정
    implementation 'org.projectlombok:lombok'
    annotationProcessor 'org.projectlombok:lombok'
    testAnnotationProcessor 'org.projectlombok:lombok'
    testImplementation 'org.projectlombok:lombok'

    // 3.2장
    implementation 'org.springframework.boot:spring-boot-starter-data-jpa'
    implementation 'com.h2database:h2'
    testImplementation 'org.springframework.boot:spring-boot-starter-test'

    // 4.2장
    implementation 'org.springframework.boot:spring-boot-starter-mustache'

    // 5.3장
    implementation 'org.springframework.boot:spring-boot-starter-oauth2-client'
}
config.auth 패키지 만들기
main→java→ 맨 위 폴더 →config.auth만들기- 보안 관련 모든 요소들을 여기에 담는다.
SecurityConfig 클래스 생성
코드
package org.example.config.auth;

import lombok.RequiredArgsConstructor;
import org.example.domain.user.Role;
import org.springframework.security.config.annotation.web.builders.HttpSecurity;
import org.springframework.security.config.annotation.web.configuration.EnableWebSecurity;
import org.springframework.security.config.annotation.web.configuration.WebSecurityConfigurerAdapter;

// 5.3장
@RequiredArgsConstructor
@EnableWebSecurity
public class SecurityConfig extends WebSecurityConfigurerAdapter {
    private final CustomOAuth2UserService customOAuth2UserService;

    @Override
    protected void configure(HttpSecurity http) throws Exception {
        http
            .csrf()
            .disable()
            .headers()
            .frameOptions()
            .disable()
            .and()
            .authorizeRequests()
            .antMatchers("/",
                    "/css/**", "/images/**",
                    "/js/**", "h2-console/**")
            .permitAll()
            .antMatchers("/api/v1/**")
            .hasRole(Role.USER.name())
            .anyRequest()
            .authenticated()
            .and()
            .logout()
            .logoutSuccessUrl("/")
            .and()
            .oauth2Login()
            .userInfoEndpoint()
            .userService(customOAuth2UserService);
    }
}
- User 클래스를 사용하지 않는 이유
OAuthAttributes 클래스 생성
코드
package org.example.config.auth.dto;

import lombok.Builder;
import lombok.Getter;
import org.example.domain.user.Role; // 직접입력
import org.example.domain.user.User; // 직접입력
import java.util.Map;

// 5.3장
@Getter
public class OAuthAttributes {
    private Map<String, Object> attributes;
    private String nameAttributeKey;
    private String name;
    private String email;
    private String picture;

    @Builder
    public OAuthAttributes(Map<String, Object> attributes, String nameAttributeKey, String name, String email, String picture) {
        this.attributes = attributes;
        this.nameAttributeKey = nameAttributeKey;
        this.name = name;
        this.email = email;
        this.picture = picture;
    }

    public static OAuthAttributes of(String registrationId, String userNameAttributeName, Map<String, Object> attributes) {
        return ofGoogle(userNameAttributeName, attributes);
    }

    private static OAuthAttributes ofGoogle(String userNameAttributeName, Map<String, Object> attributes) {
        return OAuthAttributes.builder()
                .name((String) attributes.get("name"))
                .email((String) attributes.get("email"))
                .picture((String) attributes.get("picture"))
                .attributes(attributes)
                .nameAttributeKey(userNameAttributeName)
                .build();
    }


    public User toEntity() {
        return User.builder()
                .name(name)
                .email(email)
                .picture(picture)
                .role(Role.GUEST)
                .build();
    }
}
SessionUser 클래스 생성
코드
package org.example.config.auth.dto;


import lombok.Getter;
import org.example.domain.user.User;

import javax.mail.Session;
import java.io.Serializable;

// 5.3장
@Getter
public class SessionUser implements Serializable {
    private String name;
    private String email;
    private String picture;

    public SessionUser(User user) {
        this.name = user.getName();
        this.email = user.getEmail();
        this.picture = user.getPicture();
    }
}
인증된 사용자 정보만 필요. name, email, picture만 필드로 선언
User 클래스를 사용하지 않는 이유
-
오류가 발생한다.
-
User 클래스에 직렬화를 구현하지 않았다는 내용
-
User 클래스가 엔티티이기 때문에 발생.
(엔티티는 언제 다른 엔티티와 관계가 형성될 지 모름)
-
만약 자식 엔티티가 있다면, 직렬화 대상에 자식까지 포함되기 때문에
성능 이슈, 부수 효과가 발생할 확률이 큼
-
따라서 직렬화 기능을 가진 세션 Dto를 하나 추가로 만드는 것이 운영에 도움이 됨.
CustomOAuth2UserService 클래스 생성
코드
package org.example.config.auth;


import lombok.RequiredArgsConstructor;
import org.example.config.auth.dto.OAuthAttributes;
import org.example.config.auth.dto.SessionUser;
import org.example.domain.user.User;
import org.example.domain.user.UserRepository;
import org.springframework.security.core.authority.SimpleGrantedAuthority;
import org.springframework.security.oauth2.client.userinfo.DefaultOAuth2UserService;
import org.springframework.security.oauth2.client.userinfo.OAuth2UserRequest;
import org.springframework.security.oauth2.client.userinfo.OAuth2UserService;
import org.springframework.security.oauth2.core.OAuth2AuthenticationException;
import org.springframework.security.oauth2.core.user.DefaultOAuth2User;
import org.springframework.security.oauth2.core.user.OAuth2User;
import org.springframework.stereotype.Service;

import javax.servlet.http.HttpSession;
import java.util.Collections;

@RequiredArgsConstructor
@Service
public class CustomOAuth2UserService implements OAuth2UserService<OAuth2UserRequest, OAuth2User> {
    private final UserRepository userRepository;
    private final HttpSession httpSession;

    @Override
    public OAuth2User loadUser(OAuth2UserRequest userRequest) throws OAuth2AuthenticationException {
        OAuth2UserService<OAuth2UserRequest, OAuth2User> delegate = new DefaultOAuth2UserService();
        OAuth2User oAuth2User = delegate.loadUser(userRequest);

        //
        String registrationId = userRequest
                .getClientRegistration().getRegistrationId();

        // 로그인 시 진행되는 키가 되는 필드 값
        String userNameAttributeName = userRequest
                .getClientRegistration().getProviderDetails()
                .getUserInfoEndpoint().getUserNameAttributeName();

        // OAuth2UserService
        OAuthAttributes attributes = OAuthAttributes.of(registrationId, userNameAttributeName, oAuth2User.getAttributes());

        User user = saveOrUpdate(attributes);
        httpSession.setAttribute("user", new SessionUser(user));

        return new DefaultOAuth2User(
                Collections.singleton(new SimpleGrantedAuthority(user.getRolekey())),
                attributes.getAttributes(),
                attributes.getNameAttributeKey()
        );
    }

    private User saveOrUpdate(OAuthAttributes attributes) {
        User user = userRepository.findByEmail(attributes.getEmail())
                .map(entity -> entity.update(
                        attributes.getName(),
                        attributes.getPicture()))
                .orElse(attributes.toEntity());

        return userRepository.save(user);
    }

}
- 사용자의 이름이나 사진 변경시에도 User 엔티티에 반영
로그인 테스트
Application클래스 빌드 후 localhost:8080 접속- 구글 로그인 확인
만약 다음과 같은 화면이 나온다면, 정상이다.
(아직 권한이 GUEST이기 때문에 발생하는 오류)
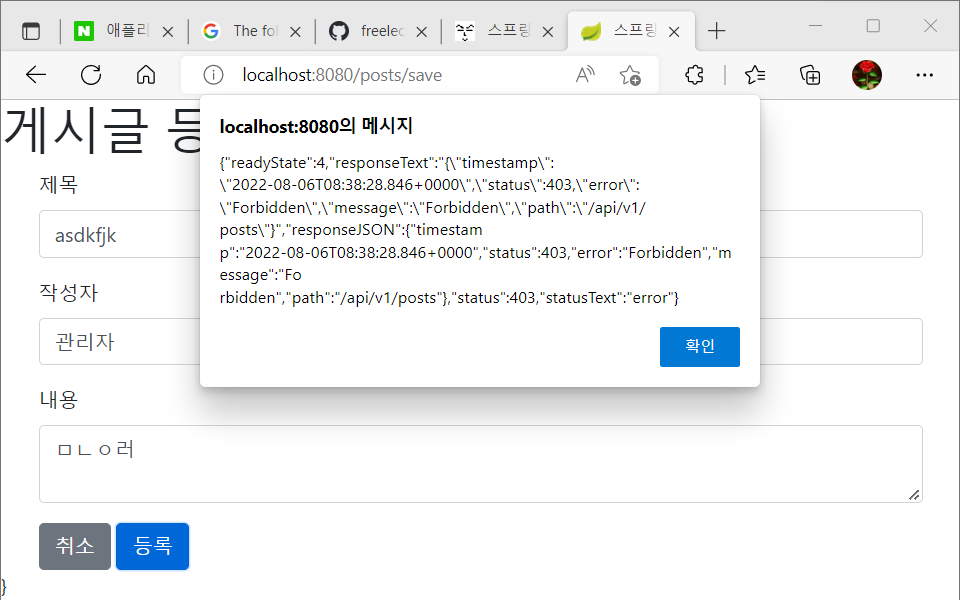
이제 localhost:8080/h2-console 로 들어가자.
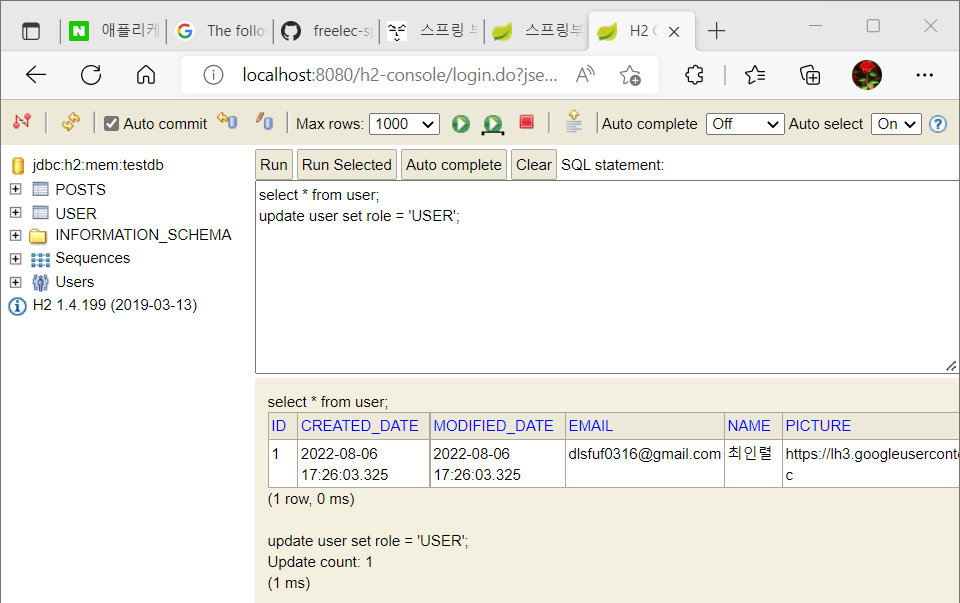
우선 로그아웃을 한 뒤, 다시 localhost:8080 으로 가서 글을 등록해보자.
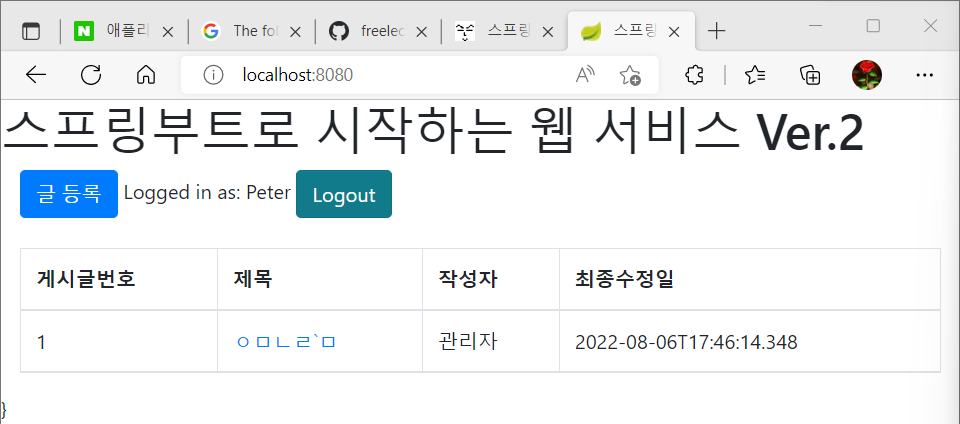
잘 되는 것을 확인할 수 있다.
5.4 어노테이션 기반 개선하기
- 반복되는 코드에 대한 개선
반복되는 코드 값 개선하기
IndexController→ 세션 값이 필요할 때 마다 계속 불러와야 함.- 메소드 인자로 세선값을 바로 받을 수 있게 개선하기
SesssionUser user = (SessionUser) httpSession.getAttribute("user");
-
config.auth패키지에 @LoginUser 어노테이션을 생성코드
javapackage org.example.config.auth; import java.lang.annotation.ElementType; import java.lang.annotation.Retention; import java.lang.annotation.RetentionPolicy; import java.lang.annotation.Target; // 5.4장 @Target(ElementType.PARAMETER) @Retention(RetentionPolicy.RUNTIME) public @interface LoginUser { } -
같은 위치에
LoginUserArgumentResolver생성코드
java// 5.4장 @RequiredArgsConstructor @Component public class LoginUserArgumentResolver implements HandlerMethodArgumentResolver { private final HttpSession httpSession; @Override public boolean supportsParameter(MethodParameter parameter) { boolean isLoginUserAnnotation = parameter.getParameterAnnotation(LoginUser.class) != null; boolean isUserClass = SessionUser.class.equals(parameter.getParameterType()); return isLoginUserAnnotation && isUserClass; } @Override public Object resolveArgument(MethodParameter parameter, ModelAndViewContainer mavContainer, NativeWebRequest webRequest, WebDataBinderFactory binderFactory) throws Exception { return httpSession.getAttribute("user"); } } -
WebConfig클래스 생성LoginUserArgumentResolver가 스프링에서 인식될 수 있도록 함.
코드
javapackage org.example.config; import lombok.RequiredArgsConstructor; import org.example.config.auth.LoginUserArgumentResolver; import org.springframework.context.annotation.Configuration; import org.springframework.web.method.support.HandlerMethodArgumentResolver; import org.springframework.web.servlet.config.annotation.WebMvcConfigurer; import java.util.List; // 5.4장 @RequiredArgsConstructor @Configuration public class WebConfig implements WebMvcConfigurer { private final LoginUserArgumentResolver loginUserArgumentResolver; @Override public void addArgumentResolvers( List<HandlerMethodArgumentResolver> argumentResolvers) { argumentResolvers.add(loginUserArgumentResolver); } }
IndexController 개선
코드
package org.example.web;

import lombok.RequiredArgsConstructor;
import org.example.config.auth.LoginUser;
import org.example.config.auth.dto.SessionUser;
import org.example.service.posts.PostsService;
import org.example.web.dto.PostsResponseDto;
import org.springframework.stereotype.Controller;
import org.springframework.ui.Model;
import org.springframework.web.bind.annotation.GetMapping;
import org.springframework.web.bind.annotation.PathVariable;

// 4.2장
@RequiredArgsConstructor // 4.4장에서 추가
@Controller
public class IndexController {
    private final PostsService postsService; // 4.4장에서 추가

    @GetMapping("/")
    public String index(Model model, @LoginUser SessionUser user) { /* 4.4장 추가, 5.4장 추가 */
        model.addAttribute("posts", postsService.findAllDesc()); // 4.4장 추가
        if (user != null) {
            model.addAttribute("userName", user.getName());
        } // 5.4장 추가
        return "index";
    }

    // 4.3장
    @GetMapping("/posts/save")
    public String postsSave() {
        return "posts-save";
    }

    // 4.5장
    @GetMapping("/posts/update/{id}")
    public String postsUpdate(@PathVariable Long id, Model model) {
        PostsResponseDto dto = postsService.findById(id);
        model.addAttribute("post", dto);

        return "posts-update";
    }
}
5.5 세션 저장소로 DB 사용하기
- App 재실행 시 로그인이 풀림. 왜?
-
세션이 내장 톰켓의 메모리에 저장되기 때문
-
이로 인해 2대 이상의 서버에서 서비스하고 있다면 톰캣마다 세션
동기화 설정을 해야 함.
-
- 따라서 현업에서는 다음처럼 3가지 중 1가지를 선택함.
- 톰켓 세션
-
기본적인 방식
-
2대 이상의 서버를 가진 경우 톰캣들 간의 세션 공유를 위한
추가 설정 필요.
-
- MYSQL 등 DB를 세션 저장소로 사용
- 여러 WAS 간 공용 세션을 사용할 수 있는 가장 쉬운 방법
- 많은 설정이 필요 없지만, 로그인 요청마다 DB IO 발생으로 인해
성능 이슈 발생 가능
- 메모리 DB를 세션 저장소로 사용
- B2C 서비스에서 가장 많이 사용
- 외부 메모리 서버가 필요.
- 톰켓 세션
책에서는 2번째 방식을 채택했다.
먼저, build.gradle에 다음과 같이 의존성을 등록한다.
implementation 'org.springframework.session:spring-session-jdbc'
application.properties에 세션 저장소를 jdbc로 등록하도록 코드를 추가.
spring.session.store-type=jdbc
http://localhost:8080/h2-console 로 접속
이후 h2-console을 보면 세션을 위한 테이블 2개가 생성된 것을 볼 수 있음.
JPA로 인해 세션 테이블이 자동 생성 됨.
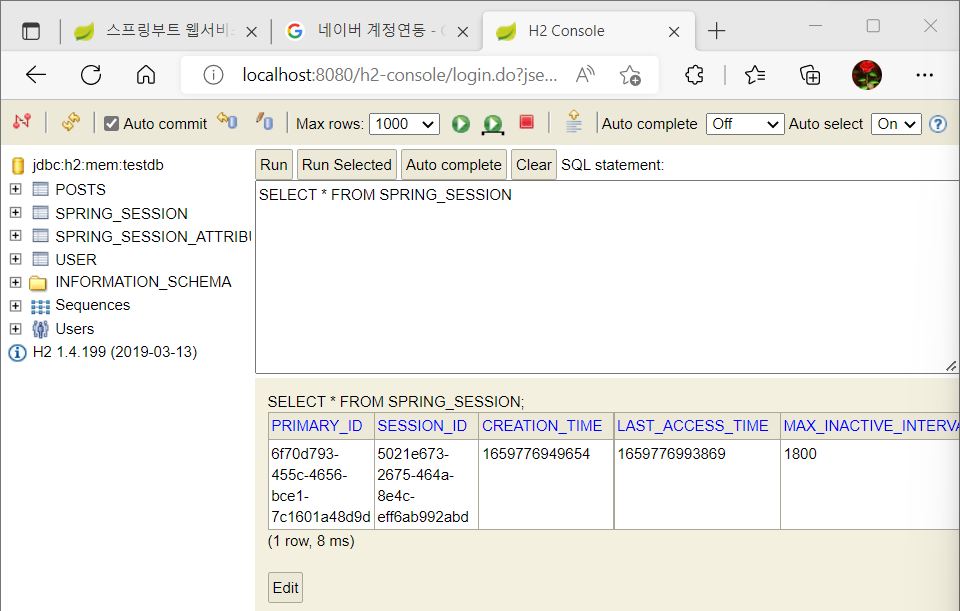
지금은 H2 기반이기에 스프링 재시작 시 H2도 재시작 되며 세션이 풀리지만,
AWS로 배포하게 되면 AWS의 DB 서비스인 RDS 사용해 세션이 풀리지 않음. (7장)
5.6 네이버 로그인 연동
네이버에서 계정만들기
- https://developers.naver.com/apps/#/register?api=nvlogin 으로 접속
- 네이버 서비스 등록 절차를 밟는다.
- 회원이름, 이메일, 프로필 사진은 필수
- PC 웹 선택
- 서비스 URL : http://localhost:8080/
- Callback URL : http://localhost:8080/login/oauth2/code/naver
- [내 어플리케이션] - ClientID와 Client Secret 확인
계정 넣어주기
- 네이버는 스프링 시큐리티를 지원하지 않음.
- 따라서 모든 설정을 다 수동으로 넣어야 함.
application-oauth.properties 등록
코드
# 5.3장 google
spring.security.oauth2.client.registration.google.client-id=318236644268-q1kue3c84ru16bu5sthb1q2fqr8lcdff.apps.googleusercontent.com
spring.security.oauth2.client.registration.google.client-secret=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
spring.security.oauth2.client.registration.google.scope=profile,email

# 5.6장 naver
! registration
spring.security.oauth2.client.registration.naver.client-id=n9F1tzuF8NEk6wrLxkhM
spring.security.oauth2.client.registration.naver.client-secret=BG3pVLpln6
spring.security.oauth2.client.registration.naver.redirect-uri={baseUrl}/{action}/oauth2/code/{registrationId}
spring.security.oauth2.client.registration.naver.authorization_grant_type=authorization_code
spring.security.oauth2.client.registration.naver.scope=name,email,profile_image
spring.security.oauth2.client.registration.naver.client-name=Naver

! provider
spring.security.oauth2.client.provider.naver.authorization_uri=https://nid.naver.com/oauth2.0/authorize
spring.security.oauth2.client.provider.naver.token_uri=https://nid.naver.com/oauth2.0/token
spring.security.oauth2.client.provider.naver.user-info-uri=https://openapi.naver.com/v1/nid/me
spring.security.oauth2.client.provider.naver.user_name_attribute=response
- 주의 :
registrationId이다. 이거 오타내면 작동을 안 한다.
스프링 시큐리티 설정 등록
OAuthAttributes에 네이버인지 판단하는 코드와 네이버 생성자 추가
코드
import org.example.domain.user.Role; // 직접입력
import org.example.domain.user.User; // 직접입력

// 5.3장
@Getter
public class OAuthAttributes {
    private Map<String, Object> attributes;
    private String nameAttributeKey;
    private String name;
    private String email;
    private String picture;

    @Builder
    public OAuthAttributes(Map<String, Object> attributes, String nameAttributeKey, String name, String email, String picture) {
        this.attributes = attributes;
        this.nameAttributeKey = nameAttributeKey;
        this.name = name;
        this.email = email;
        this.picture = picture;
    }

    public static OAuthAttributes of(String registrationId, String userNameAttributeName, Map<String, Object> attributes) {
        /* 5.6장 추가 */
        if("naver".equals(registrationId)) {
            return ofNaver("id", attributes);
        }
        /* 5.6장 추가 */

        return ofGoogle(userNameAttributeName, attributes);
    }

    private static OAuthAttributes ofGoogle(String userNameAttributeName, Map<String, Object> attributes) {
        return OAuthAttributes.builder()
                .name((String) attributes.get("name"))
                .email((String) attributes.get("email"))
                .picture((String) attributes.get("picture"))
                .attributes(attributes)
                .nameAttributeKey(userNameAttributeName)
                .build();
    }

    /* 5.6장 추가 */
    private static OAuthAttributes ofNaver(String userNameAttributeName, Map<String, Object> attributes) {
        Map<String, Object> response = (Map<String, Object>) attributes.get("response");

        return OAuthAttributes.builder()
                .name((String) response.get("name"))
                .email((String) response.get("email"))
                .picture((String) response.get("profile_image"))
                .attributes(response)
                .nameAttributeKey(userNameAttributeName)
                .build();
    }
    /* 5.6장 추가 */


    public User toEntity() {
        return User.builder()
                .name(name)
                .email(email)
                .picture(picture)
                .role(Role.GUEST)
                .build();
    }
}
index.mustache에 네이버 로그인 버튼 추가- 네이버 관련 코드가 이미 있다면 상관없음.
코드
{{>layout/header}}

<h1>스프링부트로 시작하는 웹 서비스 Ver.2</h1>
<div class="col-md-12">
    <div class="row">
        <div class="col-md-6">
            <a href="/posts/save" role="button" class="btn btn-primary">글 등록</a>
            {{#userName}}
                Logged in as: <span id="user">{{userName}}</span>
                <a href="/logout" class="btn btn-info active" role="button">Logout</a>
            {{/userName}}
            {{^userName}}
                <a href="/oauth2/authorization/google" class="btn btn-success active" role="button">Google Login</a>
                <a href="/oauth2/authorization/naver" class="btn btn-secondary active" role="button">Naver Login</a>
            {{/userName}}
        </div>
    </div>
    <br>
    <!-- 목록 출력 영역 -->
    <table class="table table-horizontal table-bordered">
        <thead class="thead-strong">
        <tr>
            <th>게시글번호</th>
            <th>제목</th>
            <th>작성자</th>
            <th>최종수정일</th>
        </tr>
        </thead>
        <tbody id="tbody">
        {{#posts}}
            <tr>
                <td>{{id}}</td>
                <td><a href="/posts/update/{{id}}">{{title}}</a></td>
                <td>{{author}}</td>
                <td>{{modifiedDate}}</td>
            </tr>
        {{/posts}}
        </tbody>
    </table>
</div>

{{>layout/footer}}
로그인 테스트
Application클래스 빌드 후 localhost:8080 접속- 네이버 로그인 확인
5.7 기존 테스트에 시큐리티 적용하기
- 기존에는 바로 API를 호출할 수 있음.
- 그러나 시큐리티 옵션이 활성화 되면서 인증된 사용자만 API 인증 가능.
- 기존의 API 테스트 코드가 모두 인증에 대한 권한을 받지 못함.
- 테스트 코드마다 인증한 사용자가 호출한 것 처럼 작동하도록 수정
전체 테스트 수행
Gradle > Tasks > verification > test
실행해 보면 실패하는 것이 나옴.
전혀 결과가 나오지 않는다면?
다음과 같은 에러코드가 나올 경우, 반드시 build.gradle을 봐야 한다.
Execution failed for task ':test'.
> There were failing tests. See the report at: file:///D:/Java/springboot3/springboot3/build/reports/tests/test/index.html

* Try:
Run with --stacktrace option to get the stack trace. Run with --info or --debug option to get more log output. Run with --scan to get full insights.
…그래서 주소로 들어가서 보면 다음과 같은 결과가 나온다.
org.gradle.api.internal.tasks.testing.TestSuiteExecutionException: Could not complete execution for Gradle Test Executor 17.
	at org.gradle.api.internal.tasks.testing.SuiteTestClassProcessor.stop(SuiteTestClassProcessor.java:63)
	at sun.reflect.NativeMethodAccessorImpl.invoke0(Native Method)
	at sun.reflect.NativeMethodAccessorImpl.invoke(NativeMethodAccessorImpl.java:62)
	at sun.reflect.DelegatingMethodAccessorImpl.invoke(DelegatingMethodAccessorImpl.java:43)
	at java.lang.reflect.Method.invoke(Method.java:498)
	at org.gradle.internal.dispatch.ReflectionDispatch.dispatch(ReflectionDispatch.java:35)
	at org.gradle.internal.dispatch.ReflectionDispatch.dispatch(ReflectionDispatch.java:24)
	at org.gradle.internal.dispatch.ContextClassLoaderDispatch.dispatch(ContextClassLoaderDispatch.java:32)
	at org.gradle.internal.dispatch.ProxyDispatchAdapter$DispatchingInvocationHandler.invoke(ProxyDispatchAdapter.java:93)
	at com.sun.proxy.$Proxy2.stop(Unknown Source)
	at org.gradle.api.internal.tasks.testing.worker.TestWorker.stop(TestWorker.java:131)
	at sun.reflect.NativeMethodAccessorImpl.invoke0(Native Method)
	at sun.reflect.NativeMethodAccessorImpl.invoke(NativeMethodAccessorImpl.java:62)
	at sun.reflect.DelegatingMethodAccessorImpl.invoke(DelegatingMethodAccessorImpl.java:43)
	at java.lang.reflect.Method.invoke(Method.java:498)
	at org.gradle.internal.dispatch.ReflectionDispatch.dispatch(ReflectionDispatch.java:35)
	at org.gradle.internal.dispatch.ReflectionDispatch.dispatch(ReflectionDispatch.java:24)
	at org.gradle.internal.remote.internal.hub.MessageHubBackedObjectConnection$DispatchWrapper.dispatch(MessageHubBackedObjectConnection.java:155)
	at org.gradle.internal.remote.internal.hub.MessageHubBackedObjectConnection$DispatchWrapper.dispatch(MessageHubBackedObjectConnection.java:137)
	at org.gradle.internal.remote.internal.hub.MessageHub$Handler.run(MessageHub.java:404)
	at org.gradle.internal.concurrent.ExecutorPolicy$CatchAndRecordFailures.onExecute(ExecutorPolicy.java:63)
	at org.gradle.internal.concurrent.ManagedExecutorImpl$1.run(ManagedExecutorImpl.java:46)
	at java.util.concurrent.ThreadPoolExecutor.runWorker(ThreadPoolExecutor.java:1149)
	at java.util.concurrent.ThreadPoolExecutor$Worker.run(ThreadPoolExecutor.java:624)
	at org.gradle.internal.concurrent.ThreadFactoryImpl$ManagedThreadRunnable.run(ThreadFactoryImpl.java:55)
	at java.lang.Thread.run(Thread.java:750)
Caused by: org.junit.platform.commons.util.PreconditionViolationException: Cannot create Launcher without at least one TestEngine; consider adding an engine implementation JAR to the classpath
	at org.junit.platform.commons.util.Preconditions.condition(Preconditions.java:285)
	at org.junit.platform.launcher.core.DefaultLauncher.<init>(DefaultLauncher.java:55)
	at org.junit.platform.launcher.core.LauncherFactory.create(LauncherFactory.java:59)
	at org.gradle.api.internal.tasks.testing.junitplatform.JUnitPlatformTestClassProcessor$CollectAllTestClassesExecutor.processAllTestClasses(JUnitPlatformTestClassProcessor.java:90)
	at org.gradle.api.internal.tasks.testing.junitplatform.JUnitPlatformTestClassProcessor$CollectAllTestClassesExecutor.access$100(JUnitPlatformTestClassProcessor.java:77)
	at org.gradle.api.internal.tasks.testing.junitplatform.JUnitPlatformTestClassProcessor.stop(JUnitPlatformTestClassProcessor.java:73)
	at org.gradle.api.internal.tasks.testing.SuiteTestClassProcessor.stop(SuiteTestClassProcessor.java:61)
	... 25 more
여기서 주목해야 할 부분은 바로 이거…!
- Caused by: org.junit.platform.commons.util.PreconditionViolationException: Cannot create Launcher without at least one TestEngine
- 엔진이 왜 없는 걸까?
인제 build.gradle을 살펴봐야 한다.
...
dependencies {
    ....
}

test {
		userJunitPlatform()
}
이 코드는 Junit5에서 통용되는 엔진이다.
- 그러나, 의존성(dependency)를 전혀 넣지 않았다.
- 또한, 책에서는 Junit4를 쓴다.
해결책 1 : Junit4만 쓴다.
dependencies {
    testImplementation 'junit:junit:4.13.2'
}

// test {userJunitPlatform()}은 아예 뺀다.
해결책 2 : Junit5를 쓰고 빈티지 엔진을 쓴다.
dependencies {
    testImplementation "junit:junit:4.13.2"
    testRuntimeOnly "org.junit.vintage:junit-vintage-engine:5.7.0"
}

test {
    useJUnitPlatform()
}
즉 필자의 경우, Junit 버전의 문법을 섞어 이러한 에러가 나왔다.
참고해야 할 웹사이트
stackoverflow.com/questions/71094273/gradle-7-3-3-run-junit-unable-to-create-testengine문제1. CustomOAuth2UserService를 찾을 수 없음
소셜 로그인 관련 설정값들이 없기 때문에 생기는 문제.
src/test에 해당 값이 없으므로 src/main을 가지고 오는데, 여기서 문제점이 발생한다.
해결책 : test > resource > application.properties 만들어주기
코드
spring.jpa.show_sql=true
spring.jpa.properties.hibernate.dialect=org.hibernate.dialect.MySQL5InnoDBDialect
spring.h2.console.enabled=true
spring.session.store-type=jdbc

# Test OAuth

spring.security.oauth2.client.registration.google.client-id=test
spring.security.oauth2.client.registration.google.client-secret=test
spring.security.oauth2.client.registration.google.scope=profile,email
문제2. 302 status code
Posts_등록된다 에서 생기는 문제로, 인증되지 않은 사용자의 요청을 이동시키기 때문에 생김.
- build.gradle > 코드 추가
코드
implementation 'org.springframework.session:spring-security-test'
- PostsApiControllerTest에 메소드 추가
코드
....
@Test
    @WithMockUser(roles="USER") /* 5.7장 추가 */
    public void upload_posts() throws Exception {
        //given
        String title = "title";
        String content = "content";
        PostsSaveRequestDto requestDto = PostsSaveRequestDto
                .builder()
                .title(title)
                .author("author")
                .build();

        String url = "http://localhost:" + port + "/api/v1/posts";

        //when
        ResponseEntity<Long> responseEntity = restTemplate.postForEntity(url, requestDto, Long.class);

        //then
        assertThat(responseEntity.getStatusCode()).isEqualTo(HttpStatus.OK);
        assertThat(responseEntity.getBody()).isGreaterThan(0L);

        List<Posts> all = postsRepository.findAll();
        assertThat(all.get(0).getTitle()).isEqualTo(title);
        assertThat(all.get(0).getContent()).isEqualTo(content);
    }

// 3.4장 수정 & 삭제 테스트 파트
    @Test
    @WithMockUser(roles="USER") /* 5.7장 추가 */
    public void change_posts() throws Exception {
        //given
        Posts savedPosts = postsRepository.save(Posts.builder()
                .title("title")
                .content("content")
                .author("author")
                .build());
        Long updateId = savedPosts.getId();
        String expectedTitle = "title2";
        String expectedContent = "Content2";

        PostsUpdateRequestDto requestDto = PostsUpdateRequestDto.builder()
                .title(expectedTitle)
                .content(expectedContent)
                .build();

        String url = "http://localhost:" + port + "api/v1/posts/" + updateId;
        HttpEntity<PostsUpdateRequestDto> requestEntity =
                new HttpEntity<>(requestDto);

        // when
        ResponseEntity<Long> responseEntity = restTemplate.exchange(url, HttpMethod.PUT, requestEntity, Long.class);

        // then
        assertThat(responseEntity.getStatusCode()).isEqualTo(HttpStatus.OK);
        assertThat(responseEntity.getBody()).isGreaterThan(0L);

        List<Posts> all = postsRepository.findAll();
        assertThat(all.get(0).getTitle()).isEqualTo(expectedTitle);
        assertThat(all.get(0).getContent()).isEqualTo(expectedContent);

    }
....
이 정도로 해도 실제로 작동하지는 않는다.
@WithMockUser가 MockMvc에서만 작동하기 때문.
따라서 @SpringBootTest 에서 MockMvc를 사용하는 방법을 이용해야 함.
PostApiControllerTest중@SpringBootTest에서MockMVC사용하기
코드
// 3.4장 등록 파트 마지막
@RunWith(SpringRunner.class)
@SpringBootTest(webEnvironment = SpringBootTest.WebEnvironment.RANDOM_PORT)
public class PostsApiControllerTest {
    @LocalServerPort
    private int port;

    @Autowired
    private TestRestTemplate restTemplate;

    @Autowired
    private PostsRepository postsRepository;

    /*5.7장 추가*/
    @Autowired
    private WebApplicationContext context;
    private MockMvc mvc;
    /*5.7장 추가*/

    @After
    public void tearDown() throws Exception {
        postsRepository.deleteAll();
    }

    /* 5.7장 추가 */
    @Before
    public void setup() {
        mvc = MockMvcBuilders
                .webAppContextSetup(context)
                .apply(springSecurity())
                .build();
    }
    /* 5.7장 추가 */


    @Test
    @WithMockUser(roles="USER") /* 5.7장 추가 */
    public void upload_posts() throws Exception {
        //given
        String title = "title";
        String content = "content";
        PostsSaveRequestDto requestDto = PostsSaveRequestDto
                .builder()
                .title(title)
                .author("author")
                .build();

        String url = "http://localhost:" + port + "/api/v1/posts";

        //when
        mvc.perform(post(url) // 5.7장 추가
                    .contentType(MediaType.APPLICATION_JSON_UTF8)
                    .content(new ObjectMapper().writeValueAsString(requestDto)))
                    .andExpect(status().isOk());

        //then
        List<Posts> all = postsRepository.findAll();
        assertThat(all.get(0).getTitle()).isEqualTo(title);
        assertThat(all.get(0).getContent()).isEqualTo(content);
    }

// 3.4장 수정 & 삭제 테스트 파트
    @Test
    @WithMockUser(roles="USER") /* 5.7장 추가 */
    public void change_posts() throws Exception {
        //given
        Posts savedPosts = postsRepository.save(Posts.builder()
                .title("title")
                .content("content")
                .author("author")
                .build());
        Long updateId = savedPosts.getId();
        String expectedTitle = "title2";
        String expectedContent = "Content2";

        PostsUpdateRequestDto requestDto = PostsUpdateRequestDto.builder()
                .title(expectedTitle)
                .content(expectedContent)
                .build();

        String url = "http://localhost:" + port + "api/v1/posts/" + updateId;

        // when
        mvc.perform(put(url) // 5.7장 추가
                .contentType(MediaType.APPLICATION_JSON_UTF8)
                .content(new ObjectMapper().writeValueAsString(requestDto)))
                .andExpect(status().isOk());


        // then
        List<Posts> all = postsRepository.findAll();
        assertThat(all.get(0).getTitle()).isEqualTo(expectedTitle);
        assertThat(all.get(0).getContent()).isEqualTo(expectedContent);

    }

}
문제3. @webMvcTest > CustomOAuth2UserService 못 찾음
- HelloControllerTest는 @webMvcTest 사용.
- @webMvcTest는 @Repository, @Service, @Component는 스캔 대상이 아님.
- 그래서 SecurityConfig는 읽었지만, SecurityConfig를 생성하기 위해 필요한 CustomOAuth2UserService는 읽을 수가 없음.
- 따라서 SecurityConfig를 제거
코드
// 2.2장
@RunWith(SpringRunner.class)
@WebMvcTest(controllers = HelloController.class,
        excludeFilters = { // 5.7장 추가
            @ComponentScan.Filter(type = FilterType.ASSIGNABLE_TYPE,
            classes = SecurityConfig.class)
            }
        ) // 5.7장 추가
public class HelloControllerTest {

    @Autowired
    private MockMvc mvc;

    @Test
    public void return_hello() throws Exception {
        String hello = "hello";

        mvc.perform(get("/hello"))
                .andExpect(status().isOk())
                .andExpect(content().string(hello));
    }
// 2.4장
    @Test
    public void return_helloDto() throws Exception {
        String name = "hello";
        int amount = 1000;

        mvc.perform(get("/hello/dto")
                        .param("name", name)
                        .param("amount", String.valueOf(amount)))
                    .andExpect(status().isOk())
                    .andExpect(jsonPath("$.name", is(name)))
                    .andExpect(jsonPath("$.amount", is(amount))
        );
    }
}
그래도 에러가 발생한다.
이 에러는 @EnableJpaAuditing으로 인해 발생.
@EnableJpaAuditing는 최소 하나 이상의 @Entity 클래스가 필요.
해결을 위해 @EnableJpaAuditing과 @SpringBootApplication 둘을 분리해야 함.
우선 Application.java에서 @EnableJpaAuditing을 제거
코드
package org.example;

import org.springframework.boot.SpringApplication;
import org.springframework.boot.autoconfigure.SpringBootApplication;
import org.springframework.data.jpa.repository.config.EnableJpaAuditing;

// 2.1장
@SpringBootApplication
// @EnableJpaAuditing /* 5.7장에서 삭제 */
public class Application {
    public static void main(String[] args) {
        SpringApplication.run(Application.class, args);
    }
}
그리고 config > JpaConfig 생성
코드
package org.example.config;

import org.springframework.context.annotation.Configuration;
import org.springframework.data.jpa.repository.config.EnableJpaAuditing;

// 5.7장 추가
@Configuration
@EnableJpaAuditing
public class JpaConfig {
}
이러면 전체 테스트 통과 가능.